May 17, 2012

Car Activities for Preschooler

As promised in my earlier post, I am posting a list of activities I either bought or made for my daughter E, who is going to be 4 at the end of this month.  Please see my post from earlier today (Car Activities for an 18-month old) for details on the bags I bought to store the activities. 

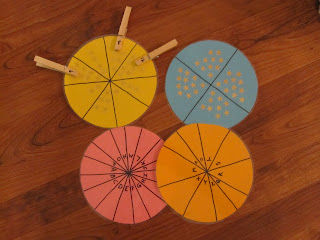
These are alphabet and counting activities.  I cut out circles from colored pieces of paper, and then divided them into sections with a black marker.  For the numbers activity, I put gold star stickers in the sections (a different number of star stickers per section).  I then numbered clothespins with the correct numbers, so E can count the stars and attach the clothespin to the correct section.  I laminated them so they are sturdier.  For the alphabet activity, I wrote a different capital letter in each section.  I then wrote lowercase letters on clothespins so she could match the lowercase letter to the uppercase letter: 


Purple pipe cleaners and some big beads so E can string beads on the pipe cleaners:


Coloring and activity sheets:  I printed off free coloring sheets from Crayola's website, and I also got free coloring sheets from Scholastic's website (Clifford the Big Red Dog, since E loves him) and from PBS Kids' website (Curious George).  The "E" made out of dots is part of an entire alphabet of "dot" letters that someon made.  I have a bag of dot markers to color the dots on the "E" and the other letters.  I got the dot letters here:  http://totschool.shannons.org/?p=2112


I printed off a travel scavenger hunt from momsminivan.com, and a travel bingo game (that the kids can color) on Crayola's website:


These are paint chip cards that I picked up from Home Depot; I cut them in half and cut small pieces of paint chips and taped them to clothespins, so E could match the clothespin to the correct color:


For the activity below, I cut up pieces of card stock to make strips.  I then bought a big tub of foam shapes, and I created patterns on the card stock.  I included extra shapes in the bag so E can find the correct shape to complete the pattern:


For the activity below, I cut pieces of card stock into strips and used foam shapes to make pictures that E will then have to recreate using the same foam shapes (I put the extra foam shapes in the bag):


I bought some play foam that comes in little balls and is not messy and does not dry out--you can mold it into shapes (you can break it apart into individual little balls, so I suppose it could end up getting a bit messy).  This is the brand I bought:  http://www.playfoam.com/.  I found it at a school supply store:


Sticker books are always a big hit in the car; I especially like the Storytime Stickers branch, Usborne sticker books, and the Little Dover sticker books (the Dover ones are incredibly cheap, just $1 or 1.50 each):


For the activity below, I took an old pill reminder box (thanks grandma and grandpa!) and wrote numbers on pieces of paper and taped them to each section of the pill box.  I then put chocolate Cheerios and dried cherries in two separate bags.  I'm going to have E count the correct number to put in the box, and maybe do addition activities by adding a certain number of cherries and Cheerios to each section.  She can then eat the results!  The pill reminder box that my in-laws gave me is awesome, because you push on a little button and that section pops up.  Also, it's a bigger-sized one, so it can fit more Cheerios and cherries:


The below activities were ones that I bought.  The item on the left is a pegboard that comes with colored rubber bands that you can put around the pegs to make designs.  On the front of the board ar squares, and the back has a heart shape.  I bought it at a school supply store, and it was really cheap.  The item on the right-hand side is one of those magnetic fishing games.  I don't remember where I bought it, but it was only $1-2 since it's a small, wind-up version (no batteries required):


I got the idea for the below activity from a post on Pinterest.  They are popsicle stick puzzles made from wooden craft sticks.  Print out a photograph (or clip art or any sort of picture) on paper.  Then, take the number of craft sticks you will need and line them up.  Place the picture on the craft sticks, and put masking tape down the sides of the craft sticks so they will stay in place while you glue the picture on.  Then, glue the picture on.  After you have glued it on (I let it dry for awhile), cut the craft sticks apart with a craft knife or box cutter or something lke that.  Then, put each puzzle in a bag.  Very easy and cheap:


These are lacing cards.  There are tons of different kinds of them.  We bought these for E last year for the car, and she liked them:


Below are another one of E's favorite car activities-magnetic activity sets.  I especially like Imagentics brand:


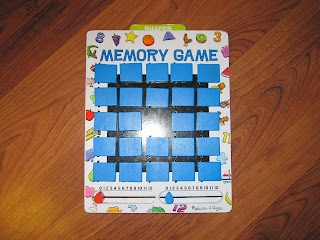
Below is a Melissa and Doug Memory game for the car that E loves:


Below are photo albums I created for the kids so they can flip through and look at pictures of themselves and family:
Car Activities for 18-month-old

Since we are getting ready for a car trip, I have been gathering (and making) car activities for both of my children.  We don't have a portable DVD player or a DVD in the car, so we have to come up with lots of things for the kids to do.  I thought it would be helpful to do a couple of posts about what I've come up with, in case it gives anyone else any brilliant ideas.  I am ALWAYS looking for ideas for car activities. 

For some of the car activities (mainly for E's, the ones I created...there aren't as many things to make for an 18-month old), I bought plastic bags to store each activity in to make it easier to grab a bag.  I found bags at the following places:  I got some cheap clear plastic pencil bags at Target for about 75 cents or something like that.  One of them broke immediately, so I don't recommend those.  I also got some plastic "book bags" from a school supply store (first picture below).  They are sturdy and work well, and I like the handles.  But they are a bit annoying to close, since you have to match up the handles.  I also got some clear plastic zipper bags from Office Depot.  They were in the section where they sell banker/money bags and things like that.  I really like those!

I will do a much longer post for activities for my preschooler (she's almost 4 now) later, hopefully tonight or tomorrow.  There are a lot more activities a preschooler can do in the car, and I made a lot of things for her.

So,  here are the activities I have for my 18-month-old:

Bag of board books:


A toddler shoe box that holds little people.  I put a self-sticking Velcro tab (sold at places like Michaels and Hobby Lobby and sewing stores, in the sewing section) on the bottom of each person, and then I put a velcro tab on top of the box lid, so W can stick and unstick the people.  The people fit inside the box.  I also included an animal:

A V-Tech magnetic toy inside of a cake pan that I bought from the $1 store--it's fairly small and lightweight so it's not super heavy or cumbersome for W to hold on his lap.  I bought a cake pan instead of a cookie sheet, so the letters would be less likely to fall out:

 Books that make sounds:

A doodle toy that I got from Target (it's Fisher Price, and it's made for 12 months +; it is really easy for a little one to use the yellow eraser to erase the picture, and it's easy to grip the attached pen that you don't have to worry about losing.  Only problem with it is that the string attaching it is pretty short--I'm sure for strangulation-hazard purposes--so it can sometimes be tricky depending on how the child is holding it:

A rain stick and an egg that spins and lights up that W got in his Easter basket this year (I bought it from Michaels):

Flash cards--I got the ones pictured below that are big and are touch-and-feel, that are designed for younger kids.  I also got some flash cards at the $1 store (shapes/colors and letters).  Even though W isn't old enough to learn his letters or shapes, I figured he could have fun taking them all out of the box:


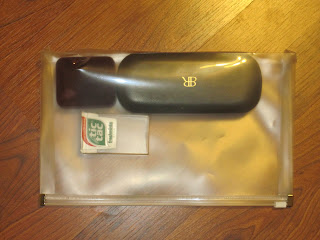
A bag that has things in it W can open and close (an old ring box, an old glasses case, and an empty Tic Tac box....I will try to add more items to this bag as I get more things):

V-Tech Touch and Teach Turtle.  Our friends got E this for her first birthday, and she has gotten a lot of mileage out of it on car trips.  W has played with it a few times and LOVES it:

Melissa & Doug wooden activity sets (the top one are cars that are attached to the board, and you move them around to the correct buildings that match the cars--or, if you're W, you can just move the cars around); the bottom one is an alphabet one, where you move the animal to the letter that corresponds with the first letter of the animal's name:

April 16, 2012

Play-doh Easter eggs

Supplies Required:

Play-doh
Sequins, glitter, confetti, etc.

Guess where we got the idea for this project?  Yes, you guessed it, Pinterest:  http://www.puttiprapancha.com/2012/03/playdough-easter-eggs.html.  We started out trying to make some Easter eggs with water balloons and embroidery floss dipped in a starch-flour mixture (another Pinterest idea that E's grandmother had so kindly brought us the supplies for) but that activity failed miserably.  E couldn't really help with it because it required too much dexterity for a 3-year-old, and so she quickly got bored.  I hated the project because the floss kept getting stuck in knots, and I have no patience when it comes to untangling things.  So we unfortunately had to abandon that project, and we decided to make Play-doh Easter eggs instead.  Easy and fun!  We made some Play-doh into egg shapes (over time, our Play-doh colors have gotten all mixed up, which made the eggs even prettier) and then decorated them with glitter and some purple and blue flower sequins I had.  But you could use all sorts of things to decorate them.  See the finished product below (they looked much prettier in person...thanks to my lack of photography skills, the picture doesn't do the finished product justice). 


April 14, 2012

Ball and Car Painting

Supplies required:

Paint
Paper
Balls
Toy Cars
Boxes or buckets or something to put the paper in (optional)

I had seen the idea for this art project in a few different places, and today we decided to try it out.  I thought it was going to be very messy, so I dressed the kids in old clothes and shoes and took them outside to do it.  It didn't turn out to be very messy at all, although if my son W had been interested in the project (he was more interested in playing basketball and playing with one of the bouncy balls we used for the project) it would have probably become a huge mess.

For this project, we found a couple of shallow boxes from Amazon that I had already cut the flaps off of to make into "drawers" for our coffee shop.  We also used a couple of plastic Easter baskets.   You could use a lot of different kinds of containers, or you could do this project without any containers at all.  I put paper in the bottom of the boxes and in the bottom of the Easter baskets (I cut the Easter basket paper into circles so it would fit.) 

For the "ball" paintings, I scattered a few drops of paint on the paper (you don't need a lot) that was in the Easter basket, then had E put the ball in there.  She then shook the basket around to make the ball roll all across the paper in the paint.  It was fun and easy.  She then wanted to try to do the ball painting in the Amazon rectangular boxes, and that worked well too. 

For the "car" paintings, we used a piece of paper in the Amazon rectangular boxes. I put some paint on a paper plate and then had E roll the car in the paint to get the wheels covered.  She then "drove" the car around on the paper.  This was a lot of fun too!  You could even put the paint right on the paper like I did for the ball painting if you wanted to cut down on the mess. 

This was  lot of fun (minus the complete meltdown my son had when we initially got out the bouncy balls for this project--he wanted to play with them, but they were small enough to choke on, so I couldn't let him play with them while I was still gathering all the things I needed.)  I thought my son W would be very interested in this project, but he could have cared less.  He was just excited to be able to play with the bouncy ball once we got outside.

E doing the ball painting:


E's ball painting in the Easter basket (I probably put in a little too much paint--and if you use black paint, it obviously has a tendency to make everything gray):


My ball painting:


E's ball painting in the box:


My car painting:


E's car painting:

April 9, 2012

Pretend coffee shop (or any kind of store)

Supplies Required:

large cardboard box
box cutter
smaller cardboard boxes for shelves, drawers, counters, etc.
play food, play dishes, coffee cups, etc. 

The idea for this activity came from Pinterest, although my family put our own coffee-obsessed twist on it.  (And yes, Pinterest is the reason I went for a couple of months without posting..I've been too busy getting new ideas for activities!)  The idea on Pinterest was for a cardboard grocery store, but we decided to make a pretend coffee shop instead (although it can be used for any sort of store, cafe, etc. and we have also used it as a grocery store).  I won't go into detail about how to make the cardboard store--it is explained here:  http://www.ikatbag.com/2011/10/greengrocer-etc.html

I brought home a large box from work that was going to be thrown away, and my husband and I cut out windows and made ledges with the windows, as it explains in the instructions.  I also used a medium-sized cardboard box and some boxes from Amazon to make "drawers." 

To make the store into a coffee shop, I set up a tall box and put the kids' pretend coffee pot (you could also use a teapot) on top of it, along with a pretend container of milk.  Every time my husband or I went to Starbucks, we rinsed out and saved our cups and lids and also saved the cardboard rings that go around the coffee cup.  We even saved some wooden sticks used as stirrers.  I put all of those supplies in one of the cardboard "drawers" I had made, and in the other drawer, we put pretend dishes, silverware, and all of the pretend food we had that were some kind of treat--donuts, cookies, etc.  E and W had a lot of fun "filling" the cups, putting on the lids and the cardboard rings, and serving my husband and I coffee.  This was definitely a fun activity, and I like that we could re-use a bunch of things we would have recycled instead.


April 8, 2012

Tie-Dye Easter eggs

Supplies Required:

Dot markers (regular markers might work too):  http://www.amazon.com/Do-A-Dot-Rainbow-Art-Set/dp/B00004W3Y4/ref=sr_1_1?ie=UTF8&qid=1333917538&sr=8-1
Coffee filters
Scissors

I got this holiday craft idea from Pinterest:  http://www.momto2poshlildivas.com/2012/03/faux-tie-dye-coffee-filter-easter-eggs.html.  We bought dot markers for this activity, so I'm not sure if it would work with regular markers (it would definitely take longer to cover the whole filter, since there isn't as much surface area on a regular marker).  But we plan to use our dot markers again.  Specifically, I plan on printing out some "do-a-dot" letters for our car trip to the beach this summer.  Here's a link to pdfs you can download for the alphabet activity:  http://totschool.shannons.org/?page_id=2360

E and I had a lot of fun making these, and it's a super easy project.  My husband even had to make one too after he saw us making them.  If you knew my husband, you would know what a plug for the activity that is!  Basically, you just take a coffee filter, cut it into an egg shape, fold it in half once, then fold it as many other times as you want to (differnet folds will make different designs).  You then use the dot markers to make dots on the filters.  (Hold the marker there for a few seconds to make sure it bleeds through all of the folded layers.)  Then, wait for it to dry (although we were too impatient to wait for it to dry) and open up the "egg." 

We taped ours to our front window, and they looked really pretty in the sunlight (excuse the blue painter's tape we used--we were all out of regular masking tape....would have looked better if the tape hadn't shown through them!)

Happy and Sad

Several months ago, our family started a tradition during dinner that we have been doing every night and plan to do into the future.  I had seen the idea in a movie I watched years and years ago (can't remember which one) and then saw the suggestion in an article I was reading more recently.  Everyone at the dinner table shares something that made them happy that day (or excited or some other positive emotion) and something that made them sad (or angry or scared or some other negative emotion).  I love the ritual of doing it every night, and I can see how much it has benefited E (our almost 4-year-old).  When we first began doing it, she would have the same happy night after night, such as, "W (her brother) got to come into school with me today" (even when she hadn't gone to school that day, and even though he always comes in with my husband to drop her off when she does go).  But over the course of a few weeks, she saw us modeling it and got better at being able to articulate what had made her happy and what had made her sad.

I love this activity because it's a great way to hear about everyone's day; it builds emotional awareness; even when you have had a bad day, it can help you reflect on something you enjoyed about the day; and it often emphasizes the little things that make  a difference.