Supplies required:
Flashlight
Play tent or something else to make a tent (blanket and chairs, blanket and card table, etc)
Water bottles
Homemade trail mix
Sleeping bag or blankets
Candle
One evening a few weeks ago, I told E that we were going to camp out the next night after dinner. I told her that she and her dad had an important job to do for our camp-out--make homemade trail mix. Since my husband was going to the grocery store that day anyway, he picked out a bunch of things to go in the trail mix, and he and my daughter made it while I was at work. He said she was so excited about it (probably at least in part because she was putting M & Ms in the trail mix.)
After dinner the next night, I told E we had to get all of our camping supplies, so we went around the house gathering the things we would need. We then "drove" to the campsite (which was in our living room). I set up the "tent" which was a blanket draped over some chairs. I put E's sleeping bag inside. We collected "wood" for our campfire (a bunch of wood blocks that I had scattered all over the living room floor outside the tent). When it was nighttime, we turned off the lights, lit a candle, and used our flashlights. We "slept" in the tent and also ate the trail mix. E had a lot of fun, and this was a pretty simple (and cheap, since we already had all of these things) activity.
We "camped out" on a warm fall night. If it had been cold out, we probably would have lit a fire in our wood-burning fireplace so that could have been our campfire. We sometimes roast marshmallows and make S'mores when we build a fire in our fireplace, so that would have definitely added to the activity. I think we'll do that sometime this winter.
You can just use things you already have around the house for this activity, but I have also seen a really neat play camping equipment set online: http://www.amazon.com/Pretend-and-Play-Camp-Set/dp/B00021Z2FK/ref=sr_1_1?ie=UTF8&qid=1322622982&sr=8-1
I didn't really take any pictures of this activity, but here is our tent:
November 29, 2011
November 20, 2011
Grocery Store
Supplies required:
play food (or you could use real food that won't spoil/spill/get ruined)
grocery cart or shopping basket or reusable grocery bag
chairs (or something else that could be a "shelf")
calculator or play cash register
For awhile, "grocery store" was one of E's favorite things to play. It's a little bit of work sorting out the food and then putting it back in place to play again, but well worth it if your child likes the activity as much as E does.
We kept this activity pretty simple, but you can make it as complicated as you like. We turned our dining area into a grocery store by lining up the dining room chairs so that the chair seats could be "shelves." We then sorted E's play food into food groups and put each food group onto a different chair. Then, one of us would be the shopper and the other one of us would be the cashier. E would take her pretend grocery cart around and pick out the food she wanted. She would then bring it to me to ring up. Before we had a play cash register, I just punched random numbers into the calculator and told her how much each item was and then gave her a total. Once we got the play cash register (I found one for only a few dollars at a Goodwill!), I was able to scan the items and it would come up with a random price. Then, I would take a turn being the shopper and E would be the cashier. I enjoy "grocery store" because there is a lot of learning involved (numbers, food groups, etc.) and it doesn't take a lot of time/work to set up. Plus, having E help me sort the food can be part of the fun.
It's been awhile since we played grocery store, but E was very into this activity when she was between 2 and 3 years old.
play food (or you could use real food that won't spoil/spill/get ruined)
grocery cart or shopping basket or reusable grocery bag
chairs (or something else that could be a "shelf")
calculator or play cash register
For awhile, "grocery store" was one of E's favorite things to play. It's a little bit of work sorting out the food and then putting it back in place to play again, but well worth it if your child likes the activity as much as E does.
We kept this activity pretty simple, but you can make it as complicated as you like. We turned our dining area into a grocery store by lining up the dining room chairs so that the chair seats could be "shelves." We then sorted E's play food into food groups and put each food group onto a different chair. Then, one of us would be the shopper and the other one of us would be the cashier. E would take her pretend grocery cart around and pick out the food she wanted. She would then bring it to me to ring up. Before we had a play cash register, I just punched random numbers into the calculator and told her how much each item was and then gave her a total. Once we got the play cash register (I found one for only a few dollars at a Goodwill!), I was able to scan the items and it would come up with a random price. Then, I would take a turn being the shopper and E would be the cashier. I enjoy "grocery store" because there is a lot of learning involved (numbers, food groups, etc.) and it doesn't take a lot of time/work to set up. Plus, having E help me sort the food can be part of the fun.
It's been awhile since we played grocery store, but E was very into this activity when she was between 2 and 3 years old.
Animal/Doll Hospital
Supplies required:
stuffed animals and/or dolls
blankets (we have a couple of doll blankets but also use old receiving blankets)
cardboard box lids (or anything else that could be a bed)
pretend doctor's kit (we have this one: http://www.target.com/p/B-Dr-Doctor-Medical-Kit/-/A-12026416#?lnk=sc_qi_detailimage and we love it; you could also just use medical supplies you have at home)
As E is getting older, she is starting to come up with more ideas for projects and for imaginative play. One of my favorite things to hear her say is: "I have an idea!" Back in August, she found some cardboard box lids that we had lying around for some reason. E decided that she wanted to line them up in the hallway, put animals and dolls in them, and pretend that it was a hospital. So she set to work doing this, and we also found some blankets for the "beds." We got out her doctor's kit so she could treat the patients. Although honestly, she had more fun just arranging the dolls and animals and covering and re-covering them with blankets!
This isn't a very good picture, but it at least gives you an idea of what the animal hospital looked like:
stuffed animals and/or dolls
blankets (we have a couple of doll blankets but also use old receiving blankets)
cardboard box lids (or anything else that could be a bed)
pretend doctor's kit (we have this one: http://www.target.com/p/B-Dr-Doctor-Medical-Kit/-/A-12026416#?lnk=sc_qi_detailimage and we love it; you could also just use medical supplies you have at home)
As E is getting older, she is starting to come up with more ideas for projects and for imaginative play. One of my favorite things to hear her say is: "I have an idea!" Back in August, she found some cardboard box lids that we had lying around for some reason. E decided that she wanted to line them up in the hallway, put animals and dolls in them, and pretend that it was a hospital. So she set to work doing this, and we also found some blankets for the "beds." We got out her doctor's kit so she could treat the patients. Although honestly, she had more fun just arranging the dolls and animals and covering and re-covering them with blankets!
This isn't a very good picture, but it at least gives you an idea of what the animal hospital looked like:
September 6, 2011
Animal Habitat
Supplies required:
Cardboard box or some other container for the habitat
Modeling clay (we used Crayola's "Model Magic" that comes in different colors)
Items collected from nature (sticks, small branches, leaves, pinecones, etc.)
Miniature toy animals (we used animals you can find at craft stores in tubes. Here is a link to an example on Amazon. This wasn't the exact brand we got although the mix of the animals in this one is exactly what I was looking for but couldn't find at Michael's): http://www.amazon.com/River-Otter-Adventure-Nature-playset/dp/B0038RQ57O/ref=acc_glance_t_ai_ps_t_3
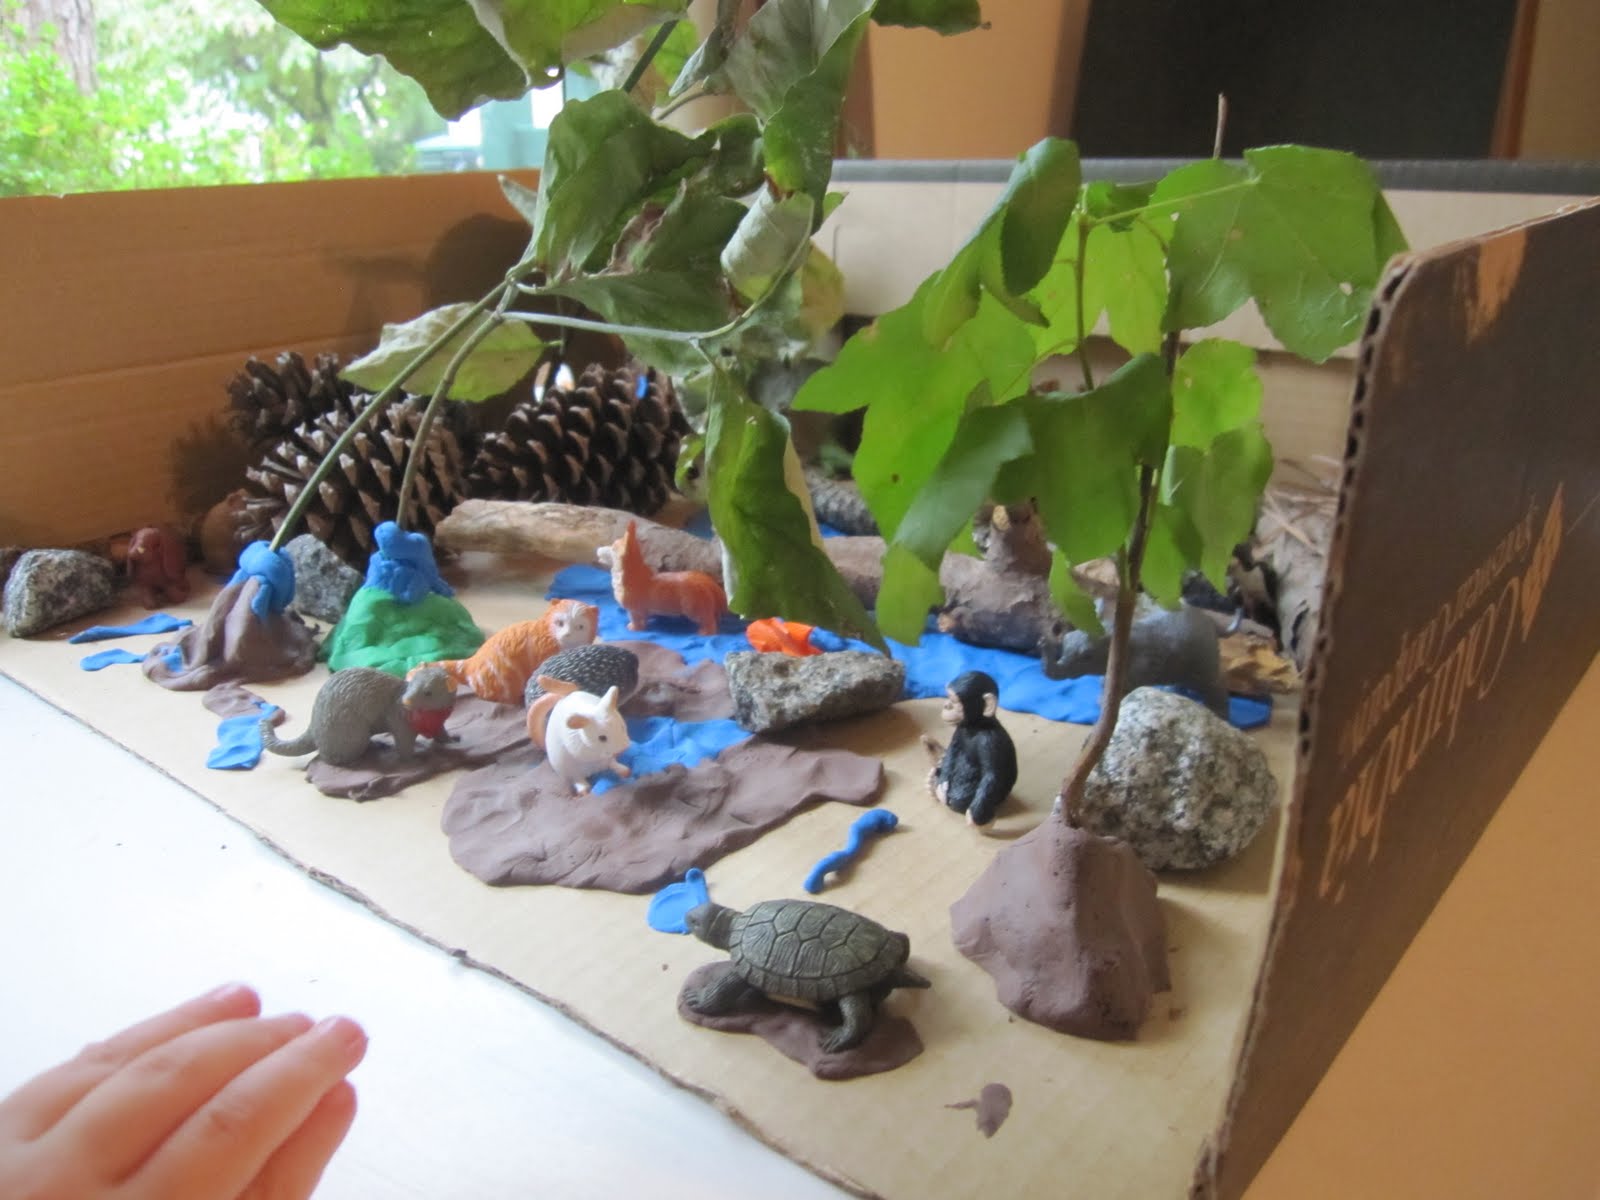
Since we knew we were going to be getting a lot of rain on Labor Day and would need a fun indoor activity, E and I went out in our yard on Sunday to collect some things to make an animal habitat. Although we live in a city, our neighborhood is very woodsy. We have tons of trees in our front yard (including both evergreen and decidiuous), so we have a never-ending supply of leaves, twigs, pinecones, pine needles, etc. We collected pinecones, pine needles, leaves, rocks, and small stems/branches/twigs.
On Monday, I searched in our garage for the perfect box for the animal habitat. I found a shoebox that was just deep enough to keep the items contained, but wasn't so deep that E wouldn't be able to reach in it easily to set things up. Because of how the box made, I was able to cut it so that it only had 3 sides, making it easy for E to reach in and build the habitat.
Cardboard box or some other container for the habitat
Modeling clay (we used Crayola's "Model Magic" that comes in different colors)
Items collected from nature (sticks, small branches, leaves, pinecones, etc.)
Miniature toy animals (we used animals you can find at craft stores in tubes. Here is a link to an example on Amazon. This wasn't the exact brand we got although the mix of the animals in this one is exactly what I was looking for but couldn't find at Michael's): http://www.amazon.com/River-Otter-Adventure-Nature-playset/dp/B0038RQ57O/ref=acc_glance_t_ai_ps_t_3
Since we knew we were going to be getting a lot of rain on Labor Day and would need a fun indoor activity, E and I went out in our yard on Sunday to collect some things to make an animal habitat. Although we live in a city, our neighborhood is very woodsy. We have tons of trees in our front yard (including both evergreen and decidiuous), so we have a never-ending supply of leaves, twigs, pinecones, pine needles, etc. We collected pinecones, pine needles, leaves, rocks, and small stems/branches/twigs.
On Monday, I searched in our garage for the perfect box for the animal habitat. I found a shoebox that was just deep enough to keep the items contained, but wasn't so deep that E wouldn't be able to reach in it easily to set things up. Because of how the box made, I was able to cut it so that it only had 3 sides, making it easy for E to reach in and build the habitat.
We started off using modeling clay (we used Crayola's Model Magic and LOVED it) to make the ground and to make a pond. Then we added some of the things we had collected in the yard. We made trees by taking some of the small branches and putting clay around the bottom of them. We made a bed of pine needles for the animals. I made a shelter for the animals by finding four twigs of about the same size, mounting them in clay to make them stand up, and placing a huge leaf on top of them to make a roof. Other than doing that and helping E with the trees, I mainly let her decide what she wanted to do with it.
E had a ton of fun making the habitat, and when she decided it was done, I got out the miniature animals. I got out a couple from a zoo babies animal tube (they can be found at craft stores like Michael's) that we already had for car trips, and also got out a pets animal tube that E's grandmother had been nice enough to get for her on Sunday. Any small toy animals will work, however. If you are talented (I am most decidedly not!) you can even make the animals out of the modeling clay and that would save money if you don't already have toy animals. Below are pictures of the tube of animals and the animals placed in the habitat.
I loved this activity: it involved some outdoor time but was a good rainy day activity (as far as the actual creating of the habitat), it wasn't very messy, E had a lot of fun both creating and playing with the habitat, and I could just let her create whatever her imagination could come up with.
September 3, 2011
Yogurt Fingerpainting
Supplies required:
Yogurt or pudding
Food dye
This is a tried-but-true activity that both my children enjoy. I've usually heard of people using pudding for this activity, but I decided to use vanilla yogurt so it would be more nutritious. I separated the yogurt into three different dishes and made blue, green, and yellow by mixing a few drops of dye into each dish. I decided not to use the red dye because I know some people are allergic to it, and we had not tried it with W. I set E up in her booster seat and poured out some of each yogurt onto the tray. I did the same on W's highchair tray. Then, I let them paint their trays (and later themselves--a bath was definitely needed after we were done!) This is a cheap, easy activity. It's obvioulsy on the messy side, but definitely worth it. W and E both got hungry while they were fingerpainting, so halfway through I added some Cheerios to their tray, figuring they could play with it and eat it.
Yogurt or pudding
Food dye
This is a tried-but-true activity that both my children enjoy. I've usually heard of people using pudding for this activity, but I decided to use vanilla yogurt so it would be more nutritious. I separated the yogurt into three different dishes and made blue, green, and yellow by mixing a few drops of dye into each dish. I decided not to use the red dye because I know some people are allergic to it, and we had not tried it with W. I set E up in her booster seat and poured out some of each yogurt onto the tray. I did the same on W's highchair tray. Then, I let them paint their trays (and later themselves--a bath was definitely needed after we were done!) This is a cheap, easy activity. It's obvioulsy on the messy side, but definitely worth it. W and E both got hungry while they were fingerpainting, so halfway through I added some Cheerios to their tray, figuring they could play with it and eat it.
August 7, 2011
Tall Painting
Supplies Required:
Wooden blocks (2 or 3 square blocks stacked on top of each other, or tall wooden blocks if you can find them)
Acrylic paints
A big piece of paper or cut up paper bag or something else to set the blocks on top of to catch the paint
The idea for this art project came from anothr website, which for the life of me I can't remember the name of. If I do, I will pass it along--it has lots of fun art project and other creative ideas. I bought all of the supplies I needed at Michael's. I am on their e-mail list, so I get coupons e-mailed to me every week. They often have 30% and 40% off coupons. I used one of those coupons to buy the wooden blocks. I found the perfect blocks for this project in the unfinished wood section of the store. The tall blocks came in a package of three, and they were for whittling. They were pretty pricey (I think it may have been $7.00 or $8.00) but with a good coupon, it wasn't a bad deal at all. I managed to find acrylic paints that were on clearance (they had a bunch of different colors on clearance when I was there) so I got the paints for $0.29 and $0.49 a piece. All in all, the project ended up being just under $5.00.
This is a fun (but very messy) project that I think would appeal to kids of varying ages. I easily could have done this project with E when she was 2, or maybe even 18 months (if I thought I could have kept the mess at least somewhat under control). Basically, you set the block (or blocks, if you have smaller blocks stacked on top of each other) on a large piece of paper or something else that will catch paint spills. Then, let your child pick a paint color and squeeze paint over the top of the block so that it runs down the sides. Keep doing this with different colors until the block is covered. It creates a neat effect (although ours didn't turn out quite as well as the one I saw on the website I got the idea from), and it was fun for E to be able to squeeze out paint. Of course, that's also one of the downsides of the project, that it does use up quite a bit of paint! After E was finished "painting" the block, we took smaller pieces of paper and made prints out of the paint that had dripped onto the big piece of paper. We basically just set the paper face down in the paint, and then picked it up and set it somewhere to dry. (If you skip the print-making, this project is not QUITE as messy.)
I should give one warning about this project: Do not attempt it on 5 hours of sleep, as I did. Paint somehow ended up on the carpet (probably because I idiotically had E do the project on her little white table that is in our living room rather than having her do it in the kitchen) and cleaning paint off the carpet is an especially frustrating task when you are exhausted! Of course, the carpet in our living room is already a huge disaster, so it was really not a big deal. (Stay tuned for the "painting carpet" project we will no doubt engage in some day right before we get new carpet or new laminate flooring.)
This project would be a great activity to do in the driveway on a nice day. (We did this project in the evening after I got off work, making doing it outside an impossibility. See the gorgeous green backdrop out the window, one of the reasons I fell in love with our house? That also means lots of mosquitos on summer evenings!)
Wooden blocks (2 or 3 square blocks stacked on top of each other, or tall wooden blocks if you can find them)
Acrylic paints
A big piece of paper or cut up paper bag or something else to set the blocks on top of to catch the paint
The idea for this art project came from anothr website, which for the life of me I can't remember the name of. If I do, I will pass it along--it has lots of fun art project and other creative ideas. I bought all of the supplies I needed at Michael's. I am on their e-mail list, so I get coupons e-mailed to me every week. They often have 30% and 40% off coupons. I used one of those coupons to buy the wooden blocks. I found the perfect blocks for this project in the unfinished wood section of the store. The tall blocks came in a package of three, and they were for whittling. They were pretty pricey (I think it may have been $7.00 or $8.00) but with a good coupon, it wasn't a bad deal at all. I managed to find acrylic paints that were on clearance (they had a bunch of different colors on clearance when I was there) so I got the paints for $0.29 and $0.49 a piece. All in all, the project ended up being just under $5.00.
This is a fun (but very messy) project that I think would appeal to kids of varying ages. I easily could have done this project with E when she was 2, or maybe even 18 months (if I thought I could have kept the mess at least somewhat under control). Basically, you set the block (or blocks, if you have smaller blocks stacked on top of each other) on a large piece of paper or something else that will catch paint spills. Then, let your child pick a paint color and squeeze paint over the top of the block so that it runs down the sides. Keep doing this with different colors until the block is covered. It creates a neat effect (although ours didn't turn out quite as well as the one I saw on the website I got the idea from), and it was fun for E to be able to squeeze out paint. Of course, that's also one of the downsides of the project, that it does use up quite a bit of paint! After E was finished "painting" the block, we took smaller pieces of paper and made prints out of the paint that had dripped onto the big piece of paper. We basically just set the paper face down in the paint, and then picked it up and set it somewhere to dry. (If you skip the print-making, this project is not QUITE as messy.)
I should give one warning about this project: Do not attempt it on 5 hours of sleep, as I did. Paint somehow ended up on the carpet (probably because I idiotically had E do the project on her little white table that is in our living room rather than having her do it in the kitchen) and cleaning paint off the carpet is an especially frustrating task when you are exhausted! Of course, the carpet in our living room is already a huge disaster, so it was really not a big deal. (Stay tuned for the "painting carpet" project we will no doubt engage in some day right before we get new carpet or new laminate flooring.)
This project would be a great activity to do in the driveway on a nice day. (We did this project in the evening after I got off work, making doing it outside an impossibility. See the gorgeous green backdrop out the window, one of the reasons I fell in love with our house? That also means lots of mosquitos on summer evenings!)
August 6, 2011
Bean Box
Advanced Preparation Required: Yes
Supplies Required:
Dry beans
Scoops or other containers
Box (cardboard or plastic)
Bowl (optional)
There is a kids' play place nearby that we take E and W to. The play place has a table that is filled with dry rice and toys. E has literally spent 45 minutes at a time playing with the rice table. So a few months before her brother W was born, E's grandmother and I made her a bean box. We bought a plastic box from Target (I tried to look for something that was deep enough, but not too big so we wouldn't need to buy tons and tons of beans for it) and then bought several bags of dry beans. Here is a picture of the box to get an idea of the depth of it:
We filled the box halfway full of beans, and then put measuring cups inside that I had purchased from the dollar store. We picked out a variety of different beans, which made it more colorful. E loved the bean box from the first time she played with it. She loved scooping the beans with the cups, transferring them from the box to a bowl, and later, she started burying things (such as Little People) in the beans and then digging them out. Sometimes she would bury things in the beans and have me find them, or vice versa. I like the bean box much better than if we had done a rice box. Rice is cheaper, but it is MUCH harder to clean up because the pieces are so little. Although this project is on the pricier size (due to having to buy several bags of beans), the cost can be reduced by using a cardboard box instead of buying one. E has gotten hours and hours of fun out of her bean box. When we are in the car, E sometimes pretends to call Grandma or Grandpa (I play Grandma or Grandpa). Almost every time, when I ask her what she did that day, she says "I played with my bean box." (Even though she hasn't.) So even when it's not being used, it's being talked about.
Supplies Required:
Dry beans
Scoops or other containers
Box (cardboard or plastic)
Bowl (optional)
There is a kids' play place nearby that we take E and W to. The play place has a table that is filled with dry rice and toys. E has literally spent 45 minutes at a time playing with the rice table. So a few months before her brother W was born, E's grandmother and I made her a bean box. We bought a plastic box from Target (I tried to look for something that was deep enough, but not too big so we wouldn't need to buy tons and tons of beans for it) and then bought several bags of dry beans. Here is a picture of the box to get an idea of the depth of it:
We filled the box halfway full of beans, and then put measuring cups inside that I had purchased from the dollar store. We picked out a variety of different beans, which made it more colorful. E loved the bean box from the first time she played with it. She loved scooping the beans with the cups, transferring them from the box to a bowl, and later, she started burying things (such as Little People) in the beans and then digging them out. Sometimes she would bury things in the beans and have me find them, or vice versa. I like the bean box much better than if we had done a rice box. Rice is cheaper, but it is MUCH harder to clean up because the pieces are so little. Although this project is on the pricier size (due to having to buy several bags of beans), the cost can be reduced by using a cardboard box instead of buying one. E has gotten hours and hours of fun out of her bean box. When we are in the car, E sometimes pretends to call Grandma or Grandpa (I play Grandma or Grandpa). Almost every time, when I ask her what she did that day, she says "I played with my bean box." (Even though she hasn't.) So even when it's not being used, it's being talked about.
Subscribe to:
Posts (Atom)